Make, Jane, make!: March 2011

Printfriendly

Small Share

Saturday, March 26, 2011

Quilting Exploits

My first quilt ever, modified from an old magazine clipping.

I would never profess to being a quilter. I've made a grand total of four quilts in my life and only two of the four really qualify as projects that actually involved a lot of piecing together. I have yet to complete a quilt with any sort of quilting more complicated than stitching in the ditch. And I would love someday to create a gorgeous free motion quilt like this talented sewer does.

Sure I have a "Quilter on Board" car decal, but it was given to me for free one day at Fabricland. I think part of my reluctance to quilt is the design factor. I'm not a very creative designer - I can imitate a given design with a certain amount of success, but I'm definitely not the type of person for whom "inspiration strikes". Maybe I don't have enough quilting experience and experienced quilters surrounding me to inspire me to design anything more interesting than this:

One of my four quilts. One of two which were actually original designs.

My other hold up with quilting is strangely not the endless cutting/piecing/sewing, but the constant trimming and cleaning up of little ends of fabric and thread left hanging and fraying off of every piece that you work with. This pet peeve was never more clearly pronounced than with my last quilting project.


This design taken from www.cranstonvillage.com. The original pattern made a slightly larger than twin size quilt, and my final project needed to be a double size duvet cover, so some alterations had to be made. All those little railroad tracks? Sewn from strips of yellow and red fabric. Definitely a labour of love, made for a boy who is practically a nephew to me.

My own son's duvet cover is just two different fabrics pieced and sandwiched together (I know, for shame, a mother not making the effort for her own children :)


So I've been kinda detoxing from this last quilt and now suddenly I think I may want to try another quilt or quilted project. Both the projects I'm eyeing are from Elizabeth Hartman at Oh, Fransson! and both are potentially needed items in my house.


Both seem like small enough projects and both offer me the opportunity to try my hand at quilting proper. I'm kinda leaning toward number two cuz it's a much smaller endeavour and I do desperately need new potholders :) Any other thoughts or suggestions?


Thursday, March 24, 2011

Covert Recipes: Pasta dough

As a follow-up to my lasagna drying fail, here is the recipe for the pasta dough that tasted good even though it was in a million pieces. I use these basic proportions for most of my homemade pasta and it passes the hubby and kid test for undetectability of whole-wheatness.


Whole Wheat Pasta Dough      For 4-6 servings of pasta

4 eggs
1/2 cup durum semolina
1-1/2 cup white flour*
1 cup whole wheat flour

Mix the dry ingredients together on a clean countertop and form into a shallow mound. Make a wide well in the middle (don't worry if countertop is showing through) and crack your eggs into the middle. Using a fork, break up the eggs yolks and beat the eggs. Once the eggs are more or less beaten, start incorporating small amounts of flour into the egg by scraping the sides of your well with the fork. Do this slowly and try to keep the egg inside your well since it minimizes your mess. When enough flour is incorporated into the egg and it no longer runs all over the countertop, you can switch to a bench scraper or your hands to knead in the rest of the flour mixture. Knead the dough until it is smooth (keeping in mind that the more you knead, the chewier your pasta will get :) Wrap it up and let it rest at room temperature for 30 minutes to an hour before shaping it.**  You could also skip the resting period and store it in the fridge for a few days or freeze the whole ball and defrost it in the fridge overnight when needed.

*You may want to reserve some of the flour and add it at the end when it's easier tell if your pasta dough is too dry or too wet. I find different brands of flour (especially whole wheat flour) really have different moisture and gluten contents. Not to mention your ambient or storage conditions :)
**You can use it immediately but it tends to be very elastic when first kneaded, waiting a bit makes it a lot easier to roll and shape.

Enjoy!

Another look at the lasagna noodles before the fall/fail.


Wednesday, March 23, 2011

Homemade Lasagna Fail

Thought I'd share this homemade pasta mistake with everyone. A few months ago, I decided to make lasagna for a large mommy group lunch at our place. While I debated on whether or not to use store-bought noodles for simplicity's sake, the homemade variety eventually won out. I had a few reasons, the first being taste/texture, the second being that I like my lasagna with lots of layers of thin noodles (versus thick meat and noodle layers) and the third being that layering a lasagna with the insanely large sheets that I usually make is way faster than using those short and skinny store ones.

I had already planned to have the traditional meat and tomato sauce lasagna, and for variety I also made Martha's Rich Artichoke and Mushroom lasagna and a ground chicken and zucchini in tomato sauce variation. I also figured that I should cut down on my workload and split up the cooking over a few days. So the sauces and fillings were prepared one to two days before and the noodles were made the night before.

Here is a glorious "before" picture of the noodles drying.


Some of you may have already spotted my fatal error in the making. Others may realize what tragedy is about to befall these noodles when I remind you that they were left out to dry overnight... in the winter time... with the heat on in the house... and the humidity at an all time low.

The next morning, I awoke early to get a head start on my lasagna assembly. As I was getting dressed, I thought I could hear the sound of papers? or something? falling downstairs. (Yes I know... cue the clueless music.) I headed downstairs oblivious to the scene I was about to walk into, rounded the corner to the kitchen and actually caught sight of a noodle breaking in half, falling to the floor and shattering into small pieces.

I didn't take a picture of this. I was too frenzied and disheartened to comprehend what I should do next. Foolishly, I contemplated making a fresh batch of noodles. But one check of the clock and the knowledge that I would have kiddies waking in less than an hour shot that idea right out the window.

So I salvaged what I could. Many of the noodles were still hanging on by a thread - I carefully broke them in half and removed them from the rack. And luckily, of the noodles that had fallen, many of them still remained in decently sized pieces (chalk it up to making them as large as I can possibly handle them). Fortunately, I had the foresight to place a large towel under the rack before I went to bed to catch any "flour dust" that may have fallen from the noodles as they dried. That towel definitely fulfilled its noodle catching duties...


So lessons learned:

  • Do not hang large noodles over just one rung of my drying rack in the interest of saving space.
  • Don't be lazy about cleaning off the kitchen counters to accomodate a few noodles.
  • Use clean towels over the backs of chairs for drying racks if I'm still too lazy about cleaning those kitchen counters. (What's a little more laundry?)
  • Maybe large, heavy noodles like that should not be left out to dry overnight, with no supervision, in a dry winter home. Perhaps I should have (again) used some clean towels and laid them out in the fridge.
  • Finally, realize that when I set myself multiple tasks expecting a perfectly mature and pristine lunch, I should really keep in mind the true nature of a lunch with 9+ mommies and 11+ kids...


Saturday, March 19, 2011

Last Minute Birthday Cake


Last weekend we finally got around to celebrating my son's first birthday. A series of unfortunate events (broken toe, strained back, baby sickness) postponed the celebration into this glorious month of March. It was a very last minute affair. My parents kindly brought over frozen and defrosted homemade Peking duck wrappers and store bought roast duck and chicken. While we were in charge of getting a few more take out items to round out the feast, as well as the birthday cake.

The morning started out well enough - we had a nice family breakfast and the kids went off to play with Baba (daddy) while I started baking the cake. It was about 10am when the cake came out of the oven to cool, leaving me plenty of time to make my cake toppers, prepare the frosting, assemble the cake, let it set, and lay some fondant on.

The cake toppers were super fun to make. Kind of like fondant play dough. The boys have both had monkey cakes for their first birthdays. Just a coincidence that their favourite stuffed animal (at the time) was/is a monkey. I posed the the monkeys in two classic poses that often we see our little guy in. They weren't perfect... but I figured the boys would like them and it was just a family gathering anyway.


At this point I was feeling pretty good about my timing. We had planned to visit friends and see their newborn at around 2 pm and it was still only 11 am. Feeling confident that I had time to spare, we had a bit of lunch and I started mixing up the buttercream. Noon came around and the buttercream was just hardening up in the fridge, while I cut the cake out.

Around 1 pm was when the crushing reality of mommy brain set in. My hubby said to me, "Why does the laptop say it's 2:15?" That was when we realized... It was the beginning of daylight saving time and we had completely forgotten! Suddenly I was applying the crumb coating to my cake an hour later than I thought. In fact, we were already supposed to be well on our way to our friends' house.

Long story short, I threw the half-finished cake in the fridge, sent a quick message to our friends saying we were late and dashed out the door. We were obviously an hour later than we had planned coming home and this made for the quickest fondant layer I've ever laid on a cake. Thrown on in a hurry while the table was being set for a long-awaited dinner and I had some moo shu frying in the wok.


You can see the cracks that inevitably developed in the cheap store-bought fondant as I speed-smoothed it over the corners. Thank goodness I had pre-coloured the fondant earlier or it would have been an even more ghetto natural white colour! So much for my plan of cutting out little green leaves to decorate the cake with :) Thankfully there was more than enough cake to go around and everyone seemed to enjoy it. The monkeys were a big hit with the boys (big brother immediately named one monkey after himself and the other after the birthday boy) and they seemed happy enough to have candles and cake.

Biggest fail of the day? Having everything occur an hour later than planned meant that the kids were up waaay past their bedtimes with sugar highs.


p.s. I wish I had taken a picture of the horrific scene the monkeys made on Day 3. One was missing all its limbs and appendages. While the other had a big bite taken out of his bum. From love to hate in the blink of an eye.


Wednesday, March 16, 2011

Thinking about Spring: Seedlings

I mentioned before that I've been sifting through old photos... and my eye was caught by this beauty.


Not the photo, but the subject of the photo. I wish we could grow bougainvillaea here.... Luckily though, this started me thinking about my garden, which started me thinking about when I should start my garden, which made me realize that I need to start soon!

Every year I waste time and money going out and buying pre-sprouted seedlings because every year I neglect to start some seeds indoors. The reasons vary. Too morning sick to think about it, too busy to think about it, no room for the trays in the sun, no room for the trays where boys won't get into them, no time or space for anything! But the universal reason is always that I never think about planting until the weather gets really warm and then by that time it's too late.

This year will be different though [triumphant finger raising and avowing]! I have officially blogged about it, so now I need to do it. First task, gotta decide what I want to plant. Here's a sampling of one of our harvests last summer:


We always plant tomatoes, and lots of them. There's nothing I dislike more than supermarket tomatoes, so we plant a lot then I roast/stew and freeze them. (Did you know that tomatoes do not ripen off the vine? The will change colour and soften but never become sweeter... hence the horrendous taste of tomatoes from the store.) Carrots were fun for the kids... Herbs, always herbs... We had eggplants and peppers as well last year, which were really nice. My hubby enjoyed his patch of Scotch Bonnet peppers which he turned into a mean Jerk rub. We had lettuce too, but we now have a resident rabbit who I've been "generously" feeding with my vegetable garden... so the lettuce will have to be on hold unless my hubby builds me the salad table that I've been promised (hint hint).

I think this summer's strategy will be different though -  we're investing in a farmshare with a local farm/CSA (community supported agriculture). So I probably shouldn't overdo it with my own veggie garden. Don't want things to go to waste simply because I didn't get around to preserving them. I was thinking that the kids may enjoy growing pumpkins. Never grew them before because they take up so much room, but since harvest volume will not be my primary aim this year, maybe we can experiment...

Anyway, hoping to get out in the next week and check out what neat heirloom seeds are readily available for those of us who didn't think to order ahead. Wish me luck. I'll probably be posting a picture of my one year-old eating soil and seedlings in the near future :)

Monday, March 14, 2011

Covert Recipes: Banana Bread

To be up front, I don't really agree with hiding food in order to trick or connive children into eating stuff. I do believe in squeezing as much nutritional value into a given food/meal as possible. You could argue that it's semantics or a sliding scale of trickiness, but I just want to be honest with my children about what they're eating. So although I will chop up my veggies extra small to make removing them from fried rice that much harder (and would you believe that my three year old can sometimes still eat all the rice out of fried rice?!?) I probably wouldn't make a habit of pureeing food to sneak it into other foods.

That being said, here is a super tasty recipe for banana bread that I've been tweaking over the years. It evolves all the time to include ever more healthful ingredients, but it always has to meet the hubby taste test -  he still doesn't want to believe that wifey is no longer using white flour most of the time.
Note: I said healthful, not low fat or sugar free. My kids are pretty skinny and my pediatrician has given me the go ahead to feed them as much butter and cream as I want:)

And yes, the blacker the better! In fact, the top banana is a little too yellow for my taste... it's just that someone keeps eating my banana bread bananas before they can get black and mushy.


Even Better Than Regular Banana Bread   Makes: 24 muffins or 2 small loaves

2 cups whole wheat flour
1/2 cup quinoa flour*
1/4 cup (or more) wheat germ
1/4 cup ground flax seed
1 tsp baking soda
1/2 tsp salt

1 cup butter, melted (or vegetable oil)
3/4 cup honey (may add additional 1/4 cup sugar if you like your bread sweet)
3 eggs
1-2 tablespoons vanilla extract
2 large overripe bananas

1/2 cup yogurt


Preheat your oven to 350F. Grease or spray your baking pans.

In a medium bowl, whisk together your dry ingredients (whole wheat flour, quinoa flour, wheat germ, flax seeds, baking soda, salt). Set aside. Sometimes I have fun adding cinnamon, nutmeg, allspice, cardamom, ground ginger, or other spices. Usually I just make the basic, and let the bananas shine through.


In your mixing bowl, beat together the butter/oil, honey and additional sugar (if desired). Once mixed, add your eggs one at a time and throw in a big splash of vanilla.


If you're using a stand mixer or hand mixer, you can add your bananas in whole. On the other hand, if you're mixing by hand or if you prefer a really uniformly textured bread, then mash your bananas first before adding them to the mixer bowl. Mix until everything is uniformly incorporated.

Slowly stir in your reserved dry ingredients alternately with the yogurt (i.e. half your dry stuff, the yogurt, then the rest of the dry stuff). You don't need to mix much, just so that there are no more dry flour chunks. You could definitely fold in some nuts or raisins or sunflower seeds or blueberries or coconut or whatever at this point. Sadly, we no longer eat banana walnut bread anymore because of the constant threat of food taxation by a baby who is still nut-free.


Divide up the batter into your prepared pans. And bake for about an hour if making loaves or 20-30 minutes depending on the size of your muffins.


They're ready when your kitchen smells wonderful and the tops look gorgeous and brown like so. (You could also stick a toothpick in and see if it comes out: Dry with some crumbs = done. Or wet with batter = not done.)

You can see that I do not even try to scoop uniform amounts of batter. I'm just not that kind of baker :P 

Let them cool for a bit in the pan for a bit. A loaf can be tipped out of the pan and cooled on a cooling rack fairly quickly. I find muffins always need a little bit more time in the pan before they can be moved without losing their tops.


Enjoy the tasty goodness. Immediately with some melting butter. Tomorrow, after the flavours have melded. Or reheated from frozen, when you want some baked goodness without the fuss at a later date.


*Found organic quinoa flour for a very good price at my local bulk food store


Saturday, March 12, 2011

Bob the Builder Costume Hack

Please excuse the super outdated Hallowe'en post. I was going through old photos today (sniff sniff, mommy nostalgia) and remembered that I had a lot of people ask me about my son's Bob the Builder costume.


It wasn't anything spectacular but it had all the requisite pieces and it made my son's chest puff up with pride every time someone pointed him out with, "Look mommy/daddy! It's Bob the Builder!"

Obviously, I did not make the overalls. Most boys have a pair of jean overalls or you could probably borrow a pair from a friend. The cheap plastic hard hat was easiest enough to find at a party store, I stapled an elastic to it to form a chin strap (windy nights). The tool belt was a length of reflective tape that I sewed a few loops into to hold the tools and then attached a plastic buckle to. The Bob the Builder doll was his own addition.

What everyone wanted to know was where I got the shirt. Bob wears a red and orange checkered shirt, which I believe was specifically designed that way to rope you into buying the official costume because: (a) you'd never be able to find a pre-made shirt in those colours or, (b) find red and orange checkered fabric to make the shirt from.

My unlicensed Bob greeting the likely also unlicensed Bob at the pumpkin patch.

The shirt is a cheap clearance red shirt from Walmart. I took an old sponge and cut it into a square stamp and used orange fabric paint to paint on the checkers. This was not the easiest way to do it since orange doesn't show up well on red and sponges aren't the best paint stampers. But this shirt was made one day before we needed it... Otherwise, I would have searched for an cheap orange shirt and found a piece of foam with which to stamp red paint checkers.

In any case, there you have it. An home hack of the Bob orange and red checkered shirt. Just remember to lay some wax paper/newspaper between the shirt layers so that the paint doesn't bleed through while you're stamping. And buy the shirt at least a size bigger if, like us, you live in a cold climate and your little one needs to wear a jacket under his shirt on the big day.

This technique could probably be applied to any strangely patterned Hallowe'en costume. I wouldn't recommend it for real clothes though, it definitely does not offer the classiest finish when viewed up close :)

Friday, March 11, 2011

Fabric Buckets for a Baby Boy

They say that the birthrate for males is declining... you would never know that amongst my friends. As my hubby would say, sometimes it's a real sausage fest at our play dates. And as any shopper for boys knows, the choices available for cute boys' clothes, toys, accessories, etc. just cannot compare to the marketing aimed at little girls. The same goes for when I'm trying to find something nice to handmake for a little boy. For girls you have dresses, hats, purses, boleros, dolls, doll clothes and on and on and on... For boys... well... there's pants and shirts. Okay, I simplify. There's a lot to be made for boys and there's even a great collection of tutorials and tips that can be found at MADE and Made By Rae. So if you're stumped and this project is not for you then you can probably find something at those venerable blogs.

For this project, I wanted something versatile and useful for new parents who had already had their baby shower and their baby. In other words, I had no idea what they needed and they were of no help when I asked, only answering, "You don't need to get us anything."

So I thought and pondered and eventually remembered this tutorial from Ric rac, which I had been meaning to put to use for the longest time. And using the old trick of monograming an otherwise plain item into a more meaningful gift, here's what I came up with:


The outer fabric is quilting flannel (with iron-on medium weight interfacing), the inner fabric is red broadcloth and the wadding is quilted batting. I followed the tutorial for the most part and only diverted to make the little windows which show a bit of the wadding and the fleece alphabet appliques.

The windows were made before sewing the layers together but after applying the interfacing to my doggie fabric. My windows are circles, but you could use any shape that your little heart desires. You need to cut out a circle of lining fabric (light blue) slightly larger than your intended window size and sew it onto the outer fabric (doggies) with the right sides facing. The stitching line is the exact shape and size of your window's outline.

The fabric circle (light blue) sewn onto my outer fabric (doggies), the centre cut out and seam allowance clipped, the window turned in and sewn onto the wadding (white).

After sewing the circle on, cut out the centre of your window just inside your stitching line. Then make small snips perpendicular to your stitching line all around the inside of the cut out... don't cut through your sewing! These little snips will help the fabric bend and stretch when you turn the lining fabric to the inside where it belongs.


Pull the lining fabric (light blue) into the hole and hold it tight while you iron it down. This may be tricky since the lining fabric needs to fold over itself and your interfaced outer fabric. Just work bit by bit and eventually it will all stay inside... or at least enough that you can proceed to the next step.

View from the front and the back: the lining pulled through the hole and folded/ironed down.

Place your outer fabric with the completed peek-thru window onto your wadding and sew all around the circle to attach the two layers together. Alternately, if you didn't want the wadding to show through and wanted to attach some other cloth or decal to the window, you would sew that on instead. Cut out your monogram letters (mine are red fleece) and applique them to the window fabric in whatever manner you like. I used a really rough zig zag stitch cuz I thought it looked cool :)


And presto! Personalization of generic fabric bucket done. Hope that JML's mom and dad can find a use for these multi-purpose buckets...

Thursday, March 10, 2011

Bacon Jam Uses: Part One

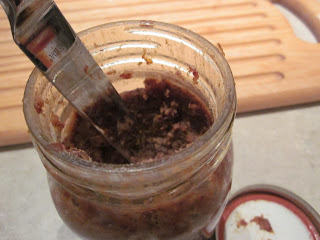
If you love bacon and have not tried bacon jam, you are going to wonder where it has been all your life when you finally take the time to whip some up. There are tons of recipes out there but I had never heard of this wondrous creation until seeing it featured in Everyday Food.  That being said, the recipe I used was the one from Martha Stewart because it seemed simple and I liked the idea of the smoky smell of bacon emanating from my slow cooker for three or more hours.


The finished jam is packed full of flavour and totally worth the minimal work involved. Although the recipe only made this one jar's worth, it's so concentrated that even my hubby, lover of all things pork, uses only the smallest bit each time.

So we're slowly discovering new and flavourful ways to use this strange and wonderful condiment. Previously, I had written about making grilled cheese with bacon jam (marble cheese here, but even better with cheddar or provolone) and hinted that I would post some other uses as we stumbled upon them.


So here's what we've tried so far with great accolades:

Goat cheese and bacon jam on puff pastry/pie crust (or, in a pinch, a cracker). This particular cracker is a Ritz with super yummy Fromagerie la Detour's Grey Owl ashed rind goat cheese topped with bacon jam.


Chicken and Brie Panini with Bacon Jam - Excuse the horrendous photos from the camera that needs to be *!#($&@. This was our delish dinner of rye bread spread with quince preserves and bacon jam, topped with grilled chicken breast, brie and baby spinach. The bacon jam was spread quite thinly, so not to overwhelm the other sandwich tastes, and added a subtle sweet smokiness to the panini.


Bacon jam and Nutella on toast - Bacon and chocolate are just meant to be together and the nuttiness of Nutella compliments the smokiness perfectly. We found that a fair amount of Nutella was needed to balance the strong taste of the jam.


We've also had bacon jam with our nachos, which leads me to believe that a layered nacho dip involving bacon jam would be super good. Mmmm... bacon, avocadoes, salsa, refried beans, cream cheese, shredded cheese, sour cream....

And stay tuned for more bacon news... the jar is not done yet and I'm sure it has yet to yield its greatest secrets! Anyone have any suggestions???

Wednesday, March 2, 2011

Neck and Face Warmer - Domo Domo Domo


What is it? Some of you may already know, but for those who don't, read on to find out how I am a slave to my childrens' whims.

Like many children, my son does not enjoy bundling up for the cold. The hassle, the constriction, the immobility - all are just cause, in his three year old mind, for a good bout of whining. So I've become one of those parents whose child has a very unfashionable, but wholly functional, winter wardrobe.


I mean look at that hat! We actually received the cutest GapKids Fairisle knit toque from his aunt for Christmas... and he refused to wear it. So we had to return the hat and pick another from the limited post-Boxing day stock. This was one of the few left by the bargain shoppers, but for him it was love at first sight. Only a boy would pick a hat like that! He calls it his "skull giraffe hat" (said in a menacing tone). His mitts are equally uncute. But they are black and white swirly (like a teenager's) and have a "Spyder" on them.

So you can imagine that getting him to wear one of my lovingly handmade, merino wool, cable-knit scarves was a next to near impossible task..


Sniff.

He did like wearing my plain white fleece neck warmer though. Which was fine for most of the winter... but I did want it back for myself for our upcoming trip to Vermont. So how to get him to part from the scarf that he had decided was his?

That's right. I pandered to his desires.

My husband picked the colour of fleece - dark brown. And from there on out, it was clear what had to be done to make this neck and face warmer wear-worthy for a monster/dinosaur/dragon obsessed little boy - Domo kun.


The construction was easy enough and the project was quite fulfilling as it is definitely beginner sewer level and took only about a half hour to complete (including entertaining-a-bored-toddler time).

I made a fabric tube with a strip of fleece (approximately 22 inches by 8 inches) which I closed with a flat-felled seam. I made sure that the stretchiness of the fabric went around the circumference of the neck, as opposed to up and down, to make for a better fit when stretched over his head and face. Then folded down the top and bottom hem and closed them with a zig zag stitch to keep the stretchiness of the fleece intact... nice thing about fleece is that it doesn't really fray, so there's no need seal in the edges of the hems.


Made the signature mouth from red fleece and white craft felt. Zig-zag stitched the teeth onto a rectangle of red fleece (only on the tooth edge... the top and bottom tooth/mouth edges will be sewn altogether in the next step).


Placed the mouth in the appropriate spot on the tube and attached the whole rectangle to the neck warmer with a slightly tighter (i.e. shorter length, wider width) zig zag stitch. Another nice thing about fleece - it sticks to itself, so no need for pinning! Although who am I kidding? I'm pretty lazy, so I pin pretty minimally even when I should be pinning.

The hardest thing about sewing with fleece? It's thick, so if you have a walking foot, take advantage of it! Otherwise, go slow, make sure you have a nice sharp needle and keep an eye on everything lining up and not slipping.

And ta-da!!! Replacement neck warmer finished.


Did it meet with the young man's approval? You be the judge.