Make, Jane, make!

Printfriendly

Small Share

Friday, February 4, 2011

Felt Ornaments: Take-home craft for a Christmas baby's birthday

For my son's third birthday party, we made felt Christmas ornaments as a take-home craft. I pre-cut all the shapes (stars, trees, snowmen, reindeers, kugels, etc) and laid out felt shapes, sequins, ribbon, batting, popsicle sticks and glue on a disposable table cloth lined counter and let the kids at it.

Put the glue in these great paint cups that I got for under $6 at the local educational warehouse sale (even at their regular price of about $10, they are still a great deal for home crafts... anything to minimize the mess!) The kids had a lot of fun designing their own special Christmas keepsake. Lots of kids slopping glue all over their felt pieces and revelling in their independence.


I was really surprised at the ornament my son created because it was the first time I'd seen him create something that actually resembled the intended subject in both form and colour. It was also really cute because the reindeer specifically had to have a red nose. He also crafted the star which has kind of a retro, sixties feel to it.

I did make the mistake of not stuffing the ornaments beforehand. Silly me thought it would be easier for the kids to decorate flat ornaments as opposed to puffy pre-stuffed ornaments. Unfortunately, I completely forgot the short and often non-existent patience of small children. As soon as they put the final sticky, still-wet, gluey touch to their masterpieces, they wanted them stuffed and sewn shut for immediate play. So there was a little bit of bribery needed to get all the children to leave their creations with me to dry while they were sent off to clean up and play for a bit. Next time, the kids will definitely be decorating ready-to-go pieces. Or maybe I'll even run the felt through my sticker maker to make the craft glue-less?

Anyway, lots of fun was had by all.

Thursday, February 3, 2011

Happy Chinese New Year!

After all the apprehension of making a taro cake, it turned out great! Actually a lot easier to make than lo bak cake since it involved no grating (I hate grating stuff). The taro cooked up really easily - just enough pieces of taro stayed whole and just enough got mushy and starchy. Of course, I forgot to take a picture of it before we cut it to give a part to my parents, but maybe a cross-sectional shot makes for better viewing.


This cake was humungous because I didn't want to separate it into two pans and then need to steam twice. Can't wait until tonight when we can feast on lo bak and taro cakes, leftover steamed fish and some traditional long noodles, prepared an untraditional way (chap jae style!)

Dessert will be the neen gow (New Year's cake). With my husband staying home for the snow day yesterday, we fried up some of the cake for breakfast. I realized that I didn't wrap it tightly enough  because it had started to dry out a little bit, but it was still delicious and soft after frying. I used a egg dip to fry them because I had such fond memories of egg dipped fried cake... somehow it wasn't as good as I remember. The egg made for a really nice crisp crust but because the egg shielded the cake from directly touching the pan, there wasn't as much burnt sugar taste (which is what I truly love). So maybe no more egg dipping. I think it may have just been the nostalgia of my now-deceased uncle frying them this way during my childhood visits to Taiwan that made them seem so much better in my memory.

On an unrelated note, I went a little baking crazy before going to my playdate/potluck lunch a few days ago and decided to also bake some matcha (green tea) cupcakes (in addition to my gruyere/asparagus tart and dim sum custard tarts). I think the little red cranberry on top makes them festive enough for CNY or Christmas :)

Yes, I suck at taking pictures and our new camera with poor light control doesn't make it any better!

Happy year of the Rabbit, everyone! 恭喜發財!

Tuesday, February 1, 2011

Chinese New Year Cooking

The house is a flurry of cooking right now as I get some traditional and non-traditional dishes ready for the Year of the Rabbit. And yes, I do live in a major city with lots of Asian food stores, but being allergic to shellfish and sensitive to MSG makes buying ready-made food a little challenging.

So firstly, one of my favs, Lo Bak cake. I made two of them this year because I just can't get enough of this thing. My version uses only lo bak, Chinese sausage and Chinese mushrooms - no dried shrimp for me or my kids. (Actually hubby is not too fond of them either, so it works for all of us!)

Recipe adapted from epicurious

Can't wait to slice into this baby on Wednesday night with my family. Love it, all fried and crisp with some sweet soy dipping sauce.... mum mum.

Then, of course, you can't forget the New Year's cake (neen gow). No red dates on mine - I know the colour is symbolic and all, but I don't like eating them and it seems a waste to put them on merely for decoration. Also, I used organic cane sugar instead of rock suga, so the colour of the cake is more tan than caramel brown.

Recipe from epicurious

I already sliced into this one just to taste it to give some to my big boy who loves both the sweet and savoury kinds of neen gow. It was perfect sweetened this year and delicious right off the slab. OOooh, it'll be so good fried up in some beaten egg... nice and crispy on the outside with the taste of caramelized sugar and soft and gooey on the inside.

Also, had to post a picture of these custard tarts I just made. Not really a food specific to Chinese New Year, they were just coincidentally made for a playdate/potluck lunch tomorrow. Before I post my picture, you'll need to look at these pictures to understand what made me laugh out loud in my kitchen tonight.

Goo Goo Goliath

Baby Barney

Okay, so keep the mental image of a cute baby being grotesquely large... And keep in mind that there is always leftover tart dough and filling whenever you make anything of that sort....

Recipe from here (subbed butter for lard)

lol... look at that monstrosity! I didn't want to break out another muffin tin just to make two or three more tarts, so I figured I would just make one large tart in a mini souffle dish. No worries though, someone in the house will "take one for the team" and eat it.

Bought a taro root today because they were on sale. Going to make a taro root cake next. Although the method is the same as for lo bak cake, I've never actually made taro root cake. Partly because I'm notoriously bad at picking taros and also because I'm afraid the taro will be all mush instead of nice soft pieces.


I'm still worried that I'll break the taro into mashed potatoes while trying to mix the batter, but at least the taro looks good... the supermarket had them cut open and on sale which definitely increased my confidence in trying to buy one again. Tomorrow night's project. Yum.


Saturday, January 29, 2011

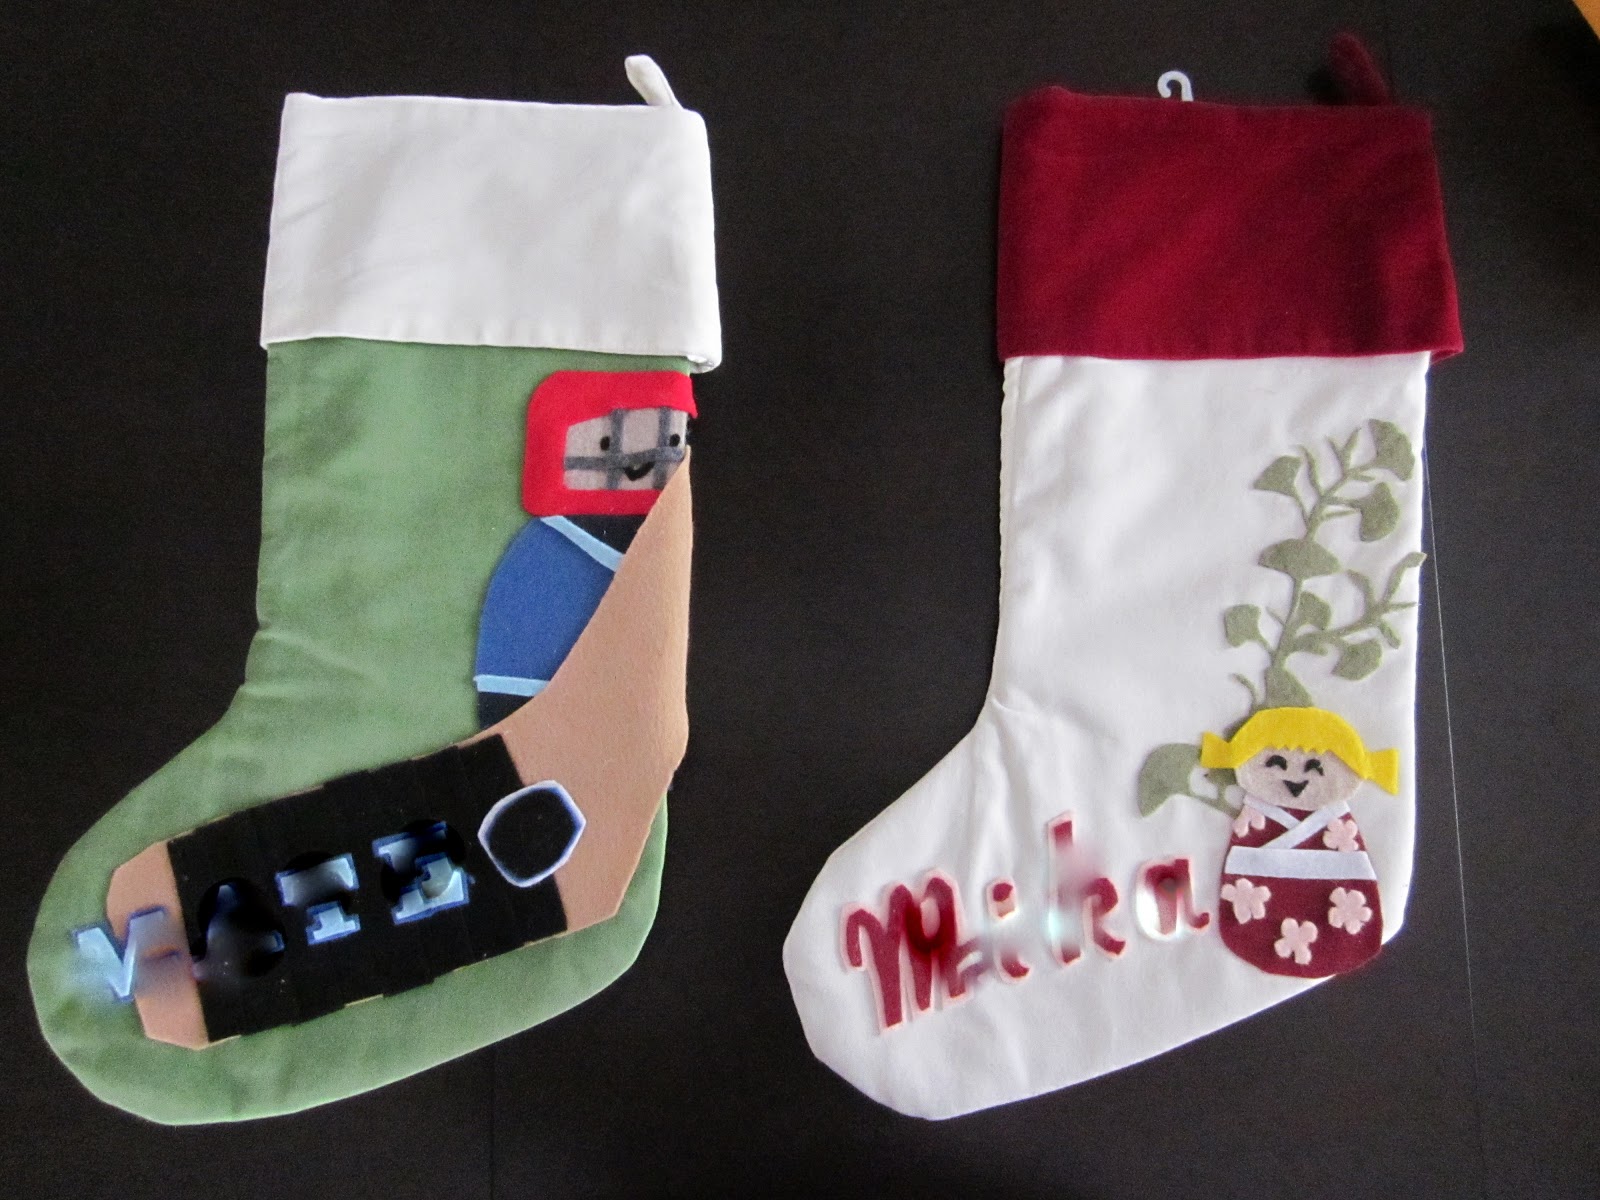
Dressing up post-Christmas clearance-priced stockings

Personalizing store-bought items is the easiest way to add a little "with love from me" to an otherwise ordinary gift. Last year, a friend asked if she could buy a set of personalized stockings from me after seeing the felt applique stocking that I had made for my son. 

Last year's monkey stocking plus this year's new baby monkey: Kids' names top secret :)

Of course, selling personalized stockings was out of the question... I most happily made them as gifts. I spotted velveteen stockings at the local grocery superstore selling for a song* during the January clearances shortly after her request. I knew they would make the perfect backdrops for a brother and sister set of stockings.

*under $7 for both, I think

The siblings are partly of Japanese descent, a hockey-loving older brother and as a sweet-as-a-doll baby sister. I wanted to use all of these facts to make the stockings one of a kind, and totally recognizable as being made especially for the kids with love. The first thing that came to mind was this gorgeous kokeki doll that I got from a trip to Japan. It seemed the perfect silhouette to mimic in felt, simple and bold.

After that initial inspiration, all I had to do was sit down with a pen and paper and start sketching ideas. Once I had the rough design down, I started cutting the shapes out of regular old craft store felt and sticking them down with white glue. Everything except for the letters and gingko branch, I cut freehand. I like the patchwork effect that you get by layering the different rough pieces of hair, face, clothing, etc one over another. The block letters on the hockey stocking were printed off the computer using a large sized serif-font and traced onto the felt. The script on the kimono girl stocking is my own handwriting "chunkified" (definitely not a word, but you understand perfectly, n'est-ce pas?). The gingko branch I just drew onto the wrong side of the felt and cut out with a small sharp pair of scissors. I used two different colours of felt for the letters to create a matte effect which totally reminds me of old school varsity letters. 


Mystery names :)

The nice thing about a project like this is that it is meant to look handmade. There are lots of places to get get store-bought stockings professionally embroidered with your dear one's name, and there are a lot of tutorials on knitting or sewing your own stockings. Not everyone is so inclined to go wholly down the commercial route or wholly down the made-from-scratch road, so this is a nice compromise. The two stockings probably took just under 2 hours from the first sketch to completion (and could have been done even faster had I not chosen to design such an intricate gingko branch). It may seem tedious to cut small shapes out of felt, but it actually transported me back to early childhood and the joy I had in simply cutting felt/paper. The whole project could easily be done while watching your favourite show. This is definitely an economical, quick and fun way to give something that you put a lot of love into to someone you care a lot about.


Tuesday, January 25, 2011

Old-fashioned Christmas Sewing: Reversible bonnet and more...

I don't if it was the Christmas season, or simply the cold weather, but my Christmas sewing had a decidedly Victorian or at least an early twentieth century theme to them. Probably a combination of cold weather fabrics and all the gorgeous tuilles and floral patterns that emerge around Christmas.

These super easy and adorable reversible baby bonnets are from Martha Pullen Co. via Sew, Mama, Sew!


I didn't have any picot edge bias binding, but luckily my machine has a nice scallop stitch among its few fancy stitches. I just attached some bias tape to my bonnet's front edge, scallop stitched, and then snipped away the excess material above the stitch to reveal a nicely bound scalloped edge. This was a great instant gratification project that used up small scraps of material in the cutest way.

The next two outfits were made for a friend's daughter and son. Both are from patterns that I got for $1 at Fabricland during their clearance sales. I love buying cheap patterns, that contain basic styles, with lots of sizes... so much easier to sew for kids who are not your own and for whom you do not have measurements when you have a pattern. Don't get me wrong, things do fit much better when you have good measurements and you can modify your sewing accordingly, but it's always so much fun when you surprise someone with new clothing... and measuring their kid when you think they're not looking is always a dead give away.

I love trying patterns with different fabrics and notions. It's amazing how much an outfit can change by simply using a different type of fabric. And if you were so inclined to add in embellishments, ruffles, ribbon, buttons, appliques, etc. you could really stretch a dollar pattern into a limitless number of pieces.

Here are the patterns that I used:


Overalls - Simplicity 2523
Dress and Purse - New Look 6926

I had this super soft wide brown corduroy that I'd originally intended on using to make overalls for my 2 year old. Little did I know that he would decide at 2 years and 2 months (coincidentally right after his baby brother came) that he wanted to be toilet trained (don't clap your hands yet, it took a painful 6 more months after that before the training was done). Anyway, point being that I didn't want to make the toilet training process any more difficult by having to deal with pulling overalls up and down. So scratch the overalls and the fabric remained washed and folded in my ever growing fabric stash. Fast forward to Christmas and suddenly I had the perfect fabric for these:

I changed the purse up a bit by adding a magnetic snap instead of a tie and added a lining using the same fabric as seen on the pocket. I also added a lining to the boy's hat to make it warmer and heavier weight to match the overalls.

So that was my Victorian Christmas sewing. Next up, a slightly Japanese spin on a Christmas craft.

Friday, January 7, 2011

Nice evenly-sized nuts.

Okay, I had a little fun with my post title today. But since it's today's post subject is never fun for me, I thought it was fitting.

I hate finely chopping nuts... It's okay for the first cupful or so, but after that I start getting tennis elbow or carpal tunnel or nutchoppinitis... whatever that tired hand, tight shoulder, sore neck feeling is called. It probably doesn't help that I'm slightly taller than average, making stooping over my cutting board to scrutinize my handiwork even more of a chore.

So I did some research to see if there was a better way and there seems to be a net-sensus that the two best ways to finely chop nuts for home baking (not including gimmicky uni-taskers like the Slap-chop :) are:

1. Put them in a zip top bag and pulverise them to your desired size with something hard like a rolling pin, meat mallet, or other heavy household item.

2. Chop them on a cutting board with your chefs knife.

I've used both methods in the past, but I usually chop by hand as I can better control the size and uniformity of my nuts. (Also banging my rolling pin on the kitchen counter is not usually the best idea during an after-the-kids-have-gone-to-bed baking session). However, it's tedious to sift through the nuts and pick out the big ones for rechopping, so I tried to find something in the house that could sort my nuts for me.


hmmm....


Let's try the colander out for size...


Not bad first pass. Took some shaking and stirring to coax those little pistachios through the holes.


And a second round of chopping begins.


It took three passes through the colander to get some pretty uniform nuts. Still had some super powdery bits, but not nearly as many as when I keep on chopping trying to get the larger nuts down to size.


Bottom line?

This produced some really nice and super uniformly sized pistachios... but I'm not sure it would be worth the trouble (of washing an extra bowl and colander) for eat-at-home baking, a smaller batch of nuts, or for nuts that were easier to chop, like pecans/almonds/etc. The only advantage was that it lessened the amount of nuts that I ground into a powder because it helped me sort out all the smaller nuts. Fun experiment, but not as successful as I would have hoped! Maybe next year I'll just throw them in the Cuisinart and let my Christmas cookies turn pistachio green? Kinda downplays the nice green colour of nuts in the blond shortbread... but then again, maybe red cranberries in a green cookie would be even more festive?

Saturday, January 1, 2011

One of my inspirations

Though I mean to get around to mentioning all the great blogs I follow sooner or later... Lier at ikatbag has a great contest going on right now that makes her the first blog I'll wax rhapsodical about.

So Lier is a craftser, sewer, mom extraordinaire. I think I've seen a post on just about every type of creative thing that you can think of on her blog. I first stumbled upon ikatbag while searching for advice on how to make a foam children's sofa. Lier had a series about working with foam, in which there was the sofa post and a gorgeous foam and felt cake which made me instantly fall in love with her whimsical style. I then, of course, whiled away the next hour of my life sifting through other posts on ikatbag, enjoying her easy and honest blogging style, gawking at pictures of immaculate sewing, and bookmarking realistic make at home projects.

Go check it out!
I added ikatbag to google reader and started following along. I got totally hooked when Lier started her drafting series and am still spellbound with her latest tutorial on pockets. As soon as I get some time in my sewing line-up, I'm definitely going to run through this series one pocket at a time. 


So what's the contest? Well I'd love to win the beautiful "Pocketful of Sky" teaching quilt she made using all the pockets on the series... but if I don't win... I guess that's just a divine message for me to get off my butt and make one for myself :)


Anyway, check out ikatbag since she's got a bit of everything there! Kids crafts, felt toys, home improvement, sewing, patterns... fun ideas for anyone with children or full of child-like wonder.