Just wanted to say Happy New Year to all!
Also to mention that while there's been a scarcity of posts lately, I've still been busy making stuff. Just haven't had the time to blog about them... Just the general hustle and bustle of the holidays, paired with the new baby, throw in some hand, foot and mouth disease, various colds, toddler pneumonia and you've got a busy mommy.
So expect a bunch of belated Christmas crafting posts in the next coming weeks. Thanks for sharing in my exploits :)

Sunday, January 1, 2012

Attempting Chocolate Macarons
So much hand-made gift making this time of year and so little time! I decided to try my hand at some macarons as my gift to my son's playschool teachers. He's officially transitioned into JK now and will no longer be seeing the two wonderful ladies who have helped him make this social and academic transition with so much love and dedication for the past year.
I've made the cookie part of the macaron before and never paid much attention to getting perfect "pieds" (feet) or shiny un-cracked tops - since we would just gobble them down without so much as a look anyway :) And I've never bothered with filling them with cream or the like, since they were just being enjoyed by us at home. But since these were being made for a gift, I thought I would try to make them nice and pretty and fill them (a first!)

I think they turned out not bad... Although I'll walk you through some of my thoughts and ponderings on the making of this temperamental cookies and show you the messed up tray of macarons later in the post :P I used David Lebovitz's recipe for French Chocolate Macarons because you can't go wrong with one of his recipes!

Unfortunately, I didn't make it out to the health food store where they sell almond meal/flour. So I had to make do with grinding up some sliced almonds. As you can see, you an only get them to a certain fineness at home...

I could tell during the folding process that my macarons were going to have fine chunks of almond in them! (My hubby actually liked them this way and I do too, but I think they detract from the smooth, shiny finish in a perfectly constructed macaron.)

Piping macarons, or anything for that matter, takes a bit of practice. Although in my case, part of the problem was that I whipped the eggs whites up a little too stiff and the batter didn't really flatten out at all after they were piped onto the cookie sheet. I ended up with quite a few tails where I lifted the icing bag away... You don't want those if you're going to fill your macaron with cream/filling, because they need to lie as flat as possible when you're sandwiching them.

I took David Lebovitz's advice and tried just rapping the baking sheets really hard on the counter (no sitting time) before baking. As you can see my macarons still developed little feet but I think they could have had better feet and shinier tops if I'd let them dry out a bit, as common practice dictates. Although I'll retry this comparison between sitting and no-sitting time next time (without overbeaten egg whites/stiff batter) and see if the results are better.
And here's the promised messed-up tray of macarons.

This is what happens when you have too many trays of macarons to bake and too little time in the morning to do it in! Instead of waiting for some space on the nice, evenly heated middle racks of my oven to free up, I rushed my bake jobs and put all three sheets of macarons in at once. Needless to say, they cracked from overheating and being too close to both the bottom of the oven and the rack above them!
Not to worry though, nothing goes to waste at our house [wink]. We sandwiched those ones with some jam and ate some plain, we don't have any qualms about eating scraps at our house :P

All in all, I think they turned out okay and I had more than enough pretty ones to package up little baggies for my son's teachers. The balance of sweet and bittersweet in this recipe was perfect and the texture was melt in your mouth without being too gooey with the chocolate ganache. The only problem is that they disappeared way too fast and now I feel as if we could use some more. Maybe (my fav) pistachio next time?
I've made the cookie part of the macaron before and never paid much attention to getting perfect "pieds" (feet) or shiny un-cracked tops - since we would just gobble them down without so much as a look anyway :) And I've never bothered with filling them with cream or the like, since they were just being enjoyed by us at home. But since these were being made for a gift, I thought I would try to make them nice and pretty and fill them (a first!)

I think they turned out not bad... Although I'll walk you through some of my thoughts and ponderings on the making of this temperamental cookies and show you the messed up tray of macarons later in the post :P I used David Lebovitz's recipe for French Chocolate Macarons because you can't go wrong with one of his recipes!

Unfortunately, I didn't make it out to the health food store where they sell almond meal/flour. So I had to make do with grinding up some sliced almonds. As you can see, you an only get them to a certain fineness at home...

I could tell during the folding process that my macarons were going to have fine chunks of almond in them! (My hubby actually liked them this way and I do too, but I think they detract from the smooth, shiny finish in a perfectly constructed macaron.)

Piping macarons, or anything for that matter, takes a bit of practice. Although in my case, part of the problem was that I whipped the eggs whites up a little too stiff and the batter didn't really flatten out at all after they were piped onto the cookie sheet. I ended up with quite a few tails where I lifted the icing bag away... You don't want those if you're going to fill your macaron with cream/filling, because they need to lie as flat as possible when you're sandwiching them.

I took David Lebovitz's advice and tried just rapping the baking sheets really hard on the counter (no sitting time) before baking. As you can see my macarons still developed little feet but I think they could have had better feet and shinier tops if I'd let them dry out a bit, as common practice dictates. Although I'll retry this comparison between sitting and no-sitting time next time (without overbeaten egg whites/stiff batter) and see if the results are better.
And here's the promised messed-up tray of macarons.

This is what happens when you have too many trays of macarons to bake and too little time in the morning to do it in! Instead of waiting for some space on the nice, evenly heated middle racks of my oven to free up, I rushed my bake jobs and put all three sheets of macarons in at once. Needless to say, they cracked from overheating and being too close to both the bottom of the oven and the rack above them!
Not to worry though, nothing goes to waste at our house [wink]. We sandwiched those ones with some jam and ate some plain, we don't have any qualms about eating scraps at our house :P

All in all, I think they turned out okay and I had more than enough pretty ones to package up little baggies for my son's teachers. The balance of sweet and bittersweet in this recipe was perfect and the texture was melt in your mouth without being too gooey with the chocolate ganache. The only problem is that they disappeared way too fast and now I feel as if we could use some more. Maybe (my fav) pistachio next time?
Saturday, December 31, 2011
Hard-Sided Fabric Boxes: A Gift For My Midwives
What to get your two lovely midwives who have delivered two out of your three children and seen you through the thick and thin of pregnancy for the better part of three years? Nothing I could buy with money seemed good enough. I knew I had to invest some of myself into the gifts to make them somewhat comparable to the knowledge and expertise they've blessed us with.


To finish off the gift, I filled the basket with some home-baked goodies, a picture of them holding my newborn kiddies and a personal "thank you" note. I also wanted to knit some fingerless mittens (since they are always using their Blackberries) but I didn't have time to get out and buy the necessary knitting needles. I do have the needles now... so it'll be a project to finish and give to them when I see them again for child #4! (No, I'm not pregnant again and negotiations for child #4 are still ongoing with hubby, but a girl can hope can't she? :)
Recently, my midwives redecorated their offices and got some nice new beds. I noticed that the headboards had open shelving and thought to myself that I could make some storage boxes/buckets to help corral in the stethoscopes, alcohol wipes and other medical odds and ends that inhabited that area.
I used this Fabric Storage Box tutorial from make it and love it as the model and just changed the dimensions to what I thought would fit into the shallow headboard shelves. I liked the fact that these fabric boxes had stiff sides (rug-hooking plastic sheets from Michaels - brilliant!) without the use of lots of fleece/batting and stabilizer.

I got this really nice Michael Miller fabric from Fabricland on sale for about $5/yard. I wasn't sure what I was going to do with it at the time, but when I checked through my stash for something to make these boxes with, I knew immediately that this gorgeous, earthy, floral fabric was going to be just perfect.

I especially liked the little windows that Ashley at make it and love it added to these boxes. They allowed for some personalization of the boxes. I also thought about using some windows to showcase an appliquéd message, similar to my monogrammed fabric bucket project - but these seemed much more practical since my midwives could use the pockets to hold a storage label later.
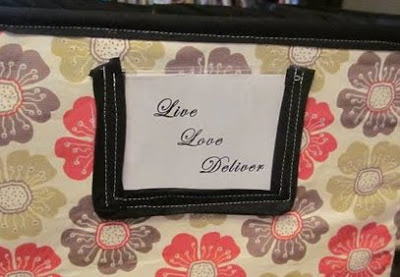
For my plastic windows, I cut up some vinyl packaging that I had lying around the house. You know, the kind that comes with bedding, kids toys, etc. I knew I was saving all that stuff for something! It always seemed like such a waste to throw away all those nice plastic pockets... and the associated snaps and zippers that they come with!

I especially liked the little windows that Ashley at make it and love it added to these boxes. They allowed for some personalization of the boxes. I also thought about using some windows to showcase an appliquéd message, similar to my monogrammed fabric bucket project - but these seemed much more practical since my midwives could use the pockets to hold a storage label later.

For my plastic windows, I cut up some vinyl packaging that I had lying around the house. You know, the kind that comes with bedding, kids toys, etc. I knew I was saving all that stuff for something! It always seemed like such a waste to throw away all those nice plastic pockets... and the associated snaps and zippers that they come with!

To finish off the gift, I filled the basket with some home-baked goodies, a picture of them holding my newborn kiddies and a personal "thank you" note. I also wanted to knit some fingerless mittens (since they are always using their Blackberries) but I didn't have time to get out and buy the necessary knitting needles. I do have the needles now... so it'll be a project to finish and give to them when I see them again for child #4! (No, I'm not pregnant again and negotiations for child #4 are still ongoing with hubby, but a girl can hope can't she? :)
Saturday, December 17, 2011
An At-Home Date Night Meal
The boys were with their grandparents last weekend and we got some time to sit down to this meal...

A cheese and meat platter with some of our favourite port (Taylor Fladgate 10 Year Old Tawny - we like the more aged stuff as well, but the price point is good on this one).
Here's a breakdown of the goods:

We bought everything at Longo's and here are some delicious combinations we found/were suggested by the little info cards at the store:
The whole platter probably only cost us about $50 plus $35 for the bottle of port and we had lots of leftover of everything. It was a nice meal to have sitting in front of the telly watching "The Sing-Off" Christmas edition while the baby slept away in the Moby Wrap. A really easy and tasty way to have date night at home.

A cheese and meat platter with some of our favourite port (Taylor Fladgate 10 Year Old Tawny - we like the more aged stuff as well, but the price point is good on this one).
Here's a breakdown of the goods:

We bought everything at Longo's and here are some delicious combinations we found/were suggested by the little info cards at the store:
- Coeur de lion with pomegranate seeds on a cornbread cracker
- Tremonti Crontonese Red Pepper with warmed honey
- Goat Gouda on a vegetable thin
- Parma prosciutto wrapped around some cantaloupe and pecorino/asiago
- Dry Sausage with anything!
The whole platter probably only cost us about $50 plus $35 for the bottle of port and we had lots of leftover of everything. It was a nice meal to have sitting in front of the telly watching "The Sing-Off" Christmas edition while the baby slept away in the Moby Wrap. A really easy and tasty way to have date night at home.
Monday, December 12, 2011
Teriyaki-glazed Brussels Sprouts
We received some amazingly fresh brussels sprouts in CSA box which came still attached to the stalk! They've been sitting in a zip top baggie in my crisper drawer since the end of October waiting for their day in the sun.

Look how vibrant they are! The leaves on each sprout were so tightly wrapped that they didn't dry out at all while sitting in my fridge. In fact, when I cut them in half prior to cooking they were still crisp on the outside and tender on the inside.
Brussels sprouts seem to be a love/hate type vegetable. The strong sulphuric smell that these cruciferous veggies give off, I think, is what causes this divide. In Chinese cooking, cruciferous vegetables (like brussels sprouts, cabbage or broccoli) are usually paired with ginger. The bright, almost citrusy taste of freshly grated ginger loves the earthy taste and smell of these veggies. So, instead of the usual bacon and brussels sprouts, I decided to braise my sprouts in a ginger-infused teriyaki sauce. The braising method served two purposes; to ensure that my halved and whole brussels sprouts had enough time to cook all the way through, and to allow the sauce to thicken and glaze the sprouts. If you think you don't like brussels sprouts, this may be the recipe to change your mind.

Pretty simple preparation. Mixed some soy, sake, sugar, mirin and ginger in a bowl and set aside. Gave my brussels sprouts a quick browning and then braised them in my sauce until they were tender.

These were super yummy enough that my sceptical three year old reluctantly tried one and then asked for more. He said they were yummy and crispy (presumably he was referring to the browned and caramelized areas).
We had these served alongside some tonkatsu (breaded pork cutlets), corn and rice. Love it when my kids love a nutritious and simple dinner!
~^*^~^*^~^*^~^*^~^*^~^*^~^*^~^*^~^*^~^*^~^*^~^*^~^*^~
Teriyaki-glazed Brussels Sprouts
2 cups brussels sprouts, halved if large
1-2 tablespoons sake
1 tablespoon brown sugar
2 tablespoons soy sauce
1 tsp mirin
1-inch piece ginger, grated*
*Check out Michael Smith, Chef at Home's tip on grating frozen ginger.


Look how vibrant they are! The leaves on each sprout were so tightly wrapped that they didn't dry out at all while sitting in my fridge. In fact, when I cut them in half prior to cooking they were still crisp on the outside and tender on the inside.
Brussels sprouts seem to be a love/hate type vegetable. The strong sulphuric smell that these cruciferous veggies give off, I think, is what causes this divide. In Chinese cooking, cruciferous vegetables (like brussels sprouts, cabbage or broccoli) are usually paired with ginger. The bright, almost citrusy taste of freshly grated ginger loves the earthy taste and smell of these veggies. So, instead of the usual bacon and brussels sprouts, I decided to braise my sprouts in a ginger-infused teriyaki sauce. The braising method served two purposes; to ensure that my halved and whole brussels sprouts had enough time to cook all the way through, and to allow the sauce to thicken and glaze the sprouts. If you think you don't like brussels sprouts, this may be the recipe to change your mind.

Pretty simple preparation. Mixed some soy, sake, sugar, mirin and ginger in a bowl and set aside. Gave my brussels sprouts a quick browning and then braised them in my sauce until they were tender.

These were super yummy enough that my sceptical three year old reluctantly tried one and then asked for more. He said they were yummy and crispy (presumably he was referring to the browned and caramelized areas).
We had these served alongside some tonkatsu (breaded pork cutlets), corn and rice. Love it when my kids love a nutritious and simple dinner!
~^*^~^*^~^*^~^*^~^*^~^*^~^*^~^*^~^*^~^*^~^*^~^*^~^*^~
Teriyaki-glazed Brussels Sprouts
2 cups brussels sprouts, halved if large
1-2 tablespoons sake
1 tablespoon brown sugar
2 tablespoons soy sauce
1 tsp mirin
1-inch piece ginger, grated*
- Mix all ingredients, except brussels sprouts, together in a small bowl. Stir until sugar is mostly dissolved. Set aside.
- Briefly fry brussels sprouts in a medium saucepan with a small amount of oil over medium high heat until they begin to brown and caramelize.
- Add sauce and lower heat to medium. Braise until the sprouts are tender enough for your liking and the sauce has thickened and begins to coat the vegetables.
*Check out Michael Smith, Chef at Home's tip on grating frozen ginger.
Wednesday, December 7, 2011
A Cake for my "Little Brother"
We celebrated our new baby's one month birthday this past weekend as well as my brother's birthday. My mom bought the baby's cake and I promised to make my brother's cake.
Big bonus if you can guess what the cake design was from this picture alone:

Here's a hint: my adult brother and I still adore this character that we remember fondly from our youth and teenage years.
Here's another hint: this loveable claymation character has always enjoyed a cult following in much of Asia.
I'll give you some time to think on it.
In the meantime, I'll give you the details of the cake. I used my all time favourite chocolate cake recipe by Martha, Devil's Food Cake with Chocolate Ganache. This cake is everything I love about chocolate cake - moist, fluffy, dark chocolate cake plus lots of rich and smooth frosting.
The original recipe calls for a two tier cake with half of the prepared ganache whipped into frosting and the other half drizzled over the cake as a glaze. I usually make it a three or four layer cake, forego the ganache glaze and whip all of the ganache into frosting. This makes a truly decadent and irresistibly delicious chocolate cake. However, with the new baby at home plus the two boys and the fact that I still had marshmallow fondant to make/cut/decorate, I decided to cut down on my work load and just make the suggested two layer cake.

If you've ever wanted to make a cake using fondant, I would definitely suggest using marshmallow fondant. It's much easier to make than conventional fondant and much tastier and easier to work with than store-bought fondant. Check out CakeJournal for a quick and simple tutorial on making marshmallow fondant using store-bought marshmallows. Or you can make it from scratch by using a marshmallow recipe like this one from Apartment Therapy the kitchn, and simply adding icing sugar to the marshmallow cream (instead of letting it cure and set into marshmallows) until the fondant becomes workable.
Okay, curious about what the cake design was yet?
PINGU!
Unfortunately there are no pictures of the interior of the cake, since every slice was quickly devoured and the birthday boy claimed all the leftover cake for his takeaway bag. You'll have to take my (and my disappointed-that-there-was-no-leftover-cake-for-the-next-morning hubby's) word for it - it was to die for [back-patting] :)
Big bonus if you can guess what the cake design was from this picture alone:

Here's a hint: my adult brother and I still adore this character that we remember fondly from our youth and teenage years.
Here's another hint: this loveable claymation character has always enjoyed a cult following in much of Asia.
I'll give you some time to think on it.
In the meantime, I'll give you the details of the cake. I used my all time favourite chocolate cake recipe by Martha, Devil's Food Cake with Chocolate Ganache. This cake is everything I love about chocolate cake - moist, fluffy, dark chocolate cake plus lots of rich and smooth frosting.
The original recipe calls for a two tier cake with half of the prepared ganache whipped into frosting and the other half drizzled over the cake as a glaze. I usually make it a three or four layer cake, forego the ganache glaze and whip all of the ganache into frosting. This makes a truly decadent and irresistibly delicious chocolate cake. However, with the new baby at home plus the two boys and the fact that I still had marshmallow fondant to make/cut/decorate, I decided to cut down on my work load and just make the suggested two layer cake.

If you've ever wanted to make a cake using fondant, I would definitely suggest using marshmallow fondant. It's much easier to make than conventional fondant and much tastier and easier to work with than store-bought fondant. Check out CakeJournal for a quick and simple tutorial on making marshmallow fondant using store-bought marshmallows. Or you can make it from scratch by using a marshmallow recipe like this one from Apartment Therapy the kitchn, and simply adding icing sugar to the marshmallow cream (instead of letting it cure and set into marshmallows) until the fondant becomes workable.
Okay, curious about what the cake design was yet?
 |
| Simple Pingu Cake :) |
PINGU!
Unfortunately there are no pictures of the interior of the cake, since every slice was quickly devoured and the birthday boy claimed all the leftover cake for his takeaway bag. You'll have to take my (and my disappointed-that-there-was-no-leftover-cake-for-the-next-morning hubby's) word for it - it was to die for [back-patting] :)
Friday, December 2, 2011
A Summer Dress in the Winter (and What Signing a Card Means to a 3 Year Old)
I've said it before and I'll say it again - it's much easier to sew for girls. There's just so much more out there and boys really don't appreciate clothing all that much... except my eldest, who can't go by a mirror without checking himself out [eye roll].
I decided on a summer dress for our little friend with a winter birthday, because it didn't seem fair that she was always getting the corduroy/denim/wool gifts and a summer baby gets her choice of bright and cheerful fabrics.

This dress is from a great pattern by New Look (6821). It has a variety of sizes and styles all in one package, making it really versatile. Also it was on sale at Fabricland and I think I picked it up for $1 or $2.
I didn't mix and match the tops and bottoms for my project because I liked the one shown just fine. It had just the right combination of clean lines on the bodice and frilliness on the tired skirt.
The lady at Fabricland and I debated over the pastel-y Michael Miller fabric that I eventually used and a bolder, more graphic print but figured that a little girl would be more into pastel pink. Also there wasn't enough yardage left of that fabric, so there you go.
Anyway, I was really happy with how the dress came out and left my son to take it downstairs to daddy for gift-bagging and birthday card signing. However, as I was bringing the baby and toddler down the stairs, I heard my hubby exclaim to my eldest, "No! Not on the dress!"
I felt my heart sink as we discovered that my son, who has trouble writing his name with pencil and paper, managed (in the 2 minutes he had to himself) to sign his name in ballpoint pen on the dress... After some tears and consternation, an internet search revealed our saviour to be rubbing alcohol and a Q-tip.
Needless to say, my weepy and repentant son had to go to the party gift-less while I performed some emergency spot treatment on the dress... lessons were learned all around :P
I decided on a summer dress for our little friend with a winter birthday, because it didn't seem fair that she was always getting the corduroy/denim/wool gifts and a summer baby gets her choice of bright and cheerful fabrics.

This dress is from a great pattern by New Look (6821). It has a variety of sizes and styles all in one package, making it really versatile. Also it was on sale at Fabricland and I think I picked it up for $1 or $2.
The lady at Fabricland and I debated over the pastel-y Michael Miller fabric that I eventually used and a bolder, more graphic print but figured that a little girl would be more into pastel pink. Also there wasn't enough yardage left of that fabric, so there you go.
Anyway, I was really happy with how the dress came out and left my son to take it downstairs to daddy for gift-bagging and birthday card signing. However, as I was bringing the baby and toddler down the stairs, I heard my hubby exclaim to my eldest, "No! Not on the dress!"
I felt my heart sink as we discovered that my son, who has trouble writing his name with pencil and paper, managed (in the 2 minutes he had to himself) to sign his name in ballpoint pen on the dress... After some tears and consternation, an internet search revealed our saviour to be rubbing alcohol and a Q-tip.
Needless to say, my weepy and repentant son had to go to the party gift-less while I performed some emergency spot treatment on the dress... lessons were learned all around :P
Subscribe to:
Posts (Atom)