Make, Jane, make!: Felt Crafts

Printfriendly

Small Share

Showing posts with label Felt Crafts. Show all posts

Thursday, December 18, 2014

The Stocking Set is Complete!


I really should have lit the fireplace for this picture.... but when you're trying to take a picture of stockings that seem to spin and all face different directions and you've got a excited toddler and a separation-anxious infant and a home-sick-from-school kindergartener all trying to squeeze into the picture as well, the last thing you want is a burned hand on a little screaming person.

Anyway, here's the kids' favourite Christmas decorations after the tree... their stockings. I'm so happy with how they turned out because I had no idea I would be making a matched set way back when I made the first stocking on a whim.

Wednesday, February 13, 2013

A Super Fifth Birthday!


Like some kind of clockwork child, my eldest son is now into superheroes.
His current favourite? Batman.
Why? "He has a cape and a mask and spiky things on his arms."

Ahh, accessories. Men love them too. Just in a different way. (For instance, my husband said he always wanted to be a hockey goalie because of the cool pads and gear... but that's a story for another day.) Today's story is about my son's super fifth birthday.


Tuesday, October 23, 2012

Hallowe'en 2012: Royalty Costume Round-up

This year's jumping off point for Hallowe'en was knights and princes(ses). And after much waiting for better weather and lighting, I finally have some decent pictures of the costumes in action.


Saturday, October 20, 2012

DIY Hallowe'en: The Felt Princess Headband Tutorial


Baby headbands are too cute, aren't they? I used to think they were more or less ornamental, or at the best, they simply served to distinguish a girl baby from a boy baby. However, now I have a baby with fine, sparse hair that is growing long and scraggly, but not growing thick enough to be held back by any hair clip, and I am beginning to understand that hairbands may serve a purpose.

So scratch using a tiara for her Hallowe'en costume because it would not have any hair to be clipped onto. And ditto for the classic circular crown because her crown definitely needs some kind of elastic to keep it anchored on her constantly moving head. The only headgear left is the venerable head/hairband.


This one was particularly easy to pull together because it consists of only three pieces and some fancy cutting.

Monday, October 15, 2012

DIY Hallowe'en: Felt and Cardboard Knights' Shields Tutorial


My sons have requested to be a knight and a prince-knight for Hallowe'en this year. You can't have a knight without a sword and a shield. This one is pretty straightforward to make, especially if you've already made the felt sword with the replaceable insert.

Saturday, October 13, 2012

DIY Hallowe'en: Felt and Cardboard Sword Tutorial


The cardboard sword. A staple of every boy's childhood. Easy, cheap, not very durable. Here's my shot at making the cardboard sword a bit more tolerant of the bumps and bruises of childhood fencing.


We've tried heavy corrugated cardboard, thick wrapping paper rolls, doubling up and taping down - but nothing has ever solved the inevitable bending and breaking of our many cardboard swords. So I began thinking about making a sword out of an etsy-staple... felt.

Of course it would still need some kind of reinforcement and thus the felt sword with a replaceable cardboard insert was born. Here's the tutorial:

Friday, October 12, 2012

DIY Hallowe'en: Felt Sword with a Cardboard Insert


Do your kids love swords? My boys do. So I am constantly saving wrapping paper rolls and other strong, sturdy pieces of cardboard to feed their sword-fighting appetites. Now that the two boys are getting older and play-fighting has become a daily occurrence, I have come under the constant assault of, "Mommy, can you make us some swords?"

Of course, there has not been a single sword that I have made or that has been bought that has survived beyond two or three play sessions. Inevitably, every sword (including, once, a little friend's plastic sword [heartfelt sorry!]) breaks or bends or somehow becomes irrecoverably damaged. There's always the possibility of wooden play swords, but I think I would have a hard time explaining to the ER doctor where my young sons got wooden swords to pummel each other to bits with.

Saturday, June 16, 2012

Sunday, April 8, 2012

Eggstatic about Easter Headband


It's a beautiful Easter weekend and I wanted to make something bright and sunny to cheer up my baby girl's outfits. So voila! The Eggstatic about Easter headband! My inspiration was this pretty pleated headband from Jess @ Craftiness is not Optional.

This was a super simple craft which is great because I didn't want to spend too much time making something that will get two or three wears at most before the weekend is over. First pick some coordinating felt (yea! using up felt scraps!) and cut out some eggs of various sizes. I find that pastel colours best convey the Easter egg feel.


I "decorated" my eggs for Easter. The large white eggs have a zig zag detail (ricrac would be great here, unfortunately I only had burgundy coloured ricrac and ruddy red ricrac just doesn't say Easter). The zig zags are cut from yellow felt using my pinking shears and sewn onto the white eggs.


The light blue eggs have a polkadot design that was made by using a screw punch randomly over the surface of the eggs. And the pink eggs have a simple heart cut out.


Originally I was going to sew the eggs to fabric tube and thread a wide elastic through the tube to form the headband. However, with all the see-through parts on my eggs, I found that I needed a headband with a bit of panache since it peeked through the eggs.


The only thing I had lying around the house that fit the bill was this hot pink ribbon. So I pinned and sewed the eggs to the ribbon and then attached a bit of elastic to the ribbon to complete the band. And here is my mini model in her Easter outfit:

Eggstatic about Easter Headband in action.
Are little girls ever anything but cute?

Wednesday, March 14, 2012

Cooking with Kids: Accessorizing with Felt Flowers

I had a disappointed customer the other day. This chef's hat actually elicited a frown from its little recipient because she expected me to make her another pretty in pink concoction (like her birthday dress), but instead she got a barely pink, mostly (gasp) white chef's hat.

So I had to improvise with some of the materials I had on hand for a quick accessorizing fix.


Felt flowers are so fast and so easy and they don't require much material. Here's a great tutorial on the basic technique from papernstitch.

I made one with a ruffled edge, jagged edge and one cut with the pinking shears and attached them to a spare piece of plastic that I had lying around.


After I thread a safety pin through the plastic, the flowers were ready to accessorize the unappreciated white hat.


And voila, I attained four year-old girly-girl approval!

Wednesday, January 18, 2012

Felt Play Food: T-Bone Steak

What else goes with felt fried eggs? A steak, of course!


I used an overcasting stitch to attach the marrow (red) to the bone (white) to give it a rough edge between marrow and bone and a running stitch to attach the bone (white) to the meat (dark red) to keep the edge of the bone sharp.

The t-bone steak was a big hit with the various adults who play with my kids. They all wanted my eldest to prepare his famous 8-Minute Steak (his own invention). The 8-Minute Steak is prepared by nuking the steak for 8 minutes... lol. My hubby was appalled and tried to teach him to sear the steak and then finish it in the oven, but my son insisted that his microwaved steak was superior. And my hubby wonders why I want to get rid of the microwave once the kids get older :)

Monday, January 16, 2012

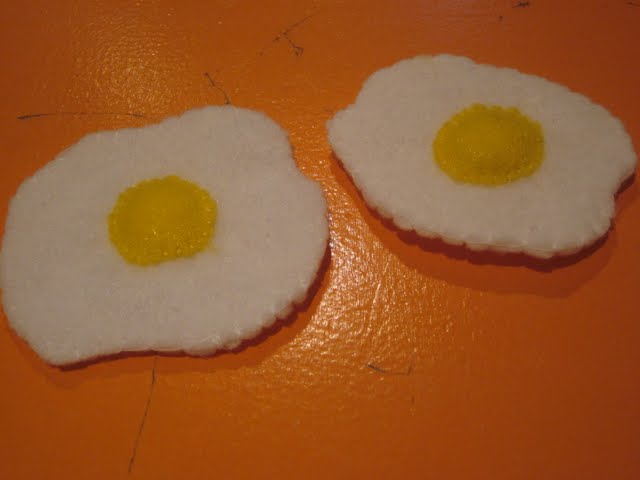
Felt Play Food: Fried Eggs

Another fun play food that can be hand sewn - sunny-side-up  eggs! The kids love eating eggs in all their incarnations, but fried eggs are probably the most fun to play make believe with. You can stick them in one of those plastic eggs that various kids toys come in and have fun cracking the egg into the pan and frying it.


Another pretty straightforward craft - two pieces of white felt for the top and bottom of the egg and one small yellow circle for the yolk.


Sew the yolk onto the white, remembering to fill the stuff the yolk with a little batting to give it some dimension before sewing the final few stitches.


Then attach the bottom white piece to cover up all the stitches from the yolk. I used a blanket stitch on the edges of the whites because I thought it gave the edges that frilly look that fried eggs have.


And of course, what's eggs without bacon? These ones are basically pieces of felt glued together.


Funny how the kids recognised the bacon right away. Maybe we eat it too much at home? Nah, there can never be too much bacon :)

Tuesday, January 10, 2012

Felt Play Food: Maki Sushi

Sometimes I want to sew, but I don't want to sit in my sewing room facing the sewing machine all night. That's when little projects like this are nice - I can sew them by hand and still spend some time with my family, veg out in front of the television, or sit and enjoy some conversation.


The construction of these tuna and salmon maki are pretty straightforward. Each one consists of two coloured squares of felt for the filling, two white felt circles for the rice and a long strip of black felt for the nori.


To save myself from any measuring and/or calculations, I used a cylinder from the kids' shape sorter as my model and cutting guide. It provided a guide to cutting perfect circles and the black felt strips were cut long enough to just wrap around it.


Here are the sushi tops and bottoms (with the coloured felt squares attached) and a completed nori tube before assembly.


Here is a view of the sushi where I've sewn the bottom rice circle onto the nori and have stuffed it full of polyester batting and am putting the finishing touches on it by sewing the top on.


I tried some different methods of sewing the rice to the nori tubes. The one on the left was sewed together with the right sides facing and then turned right-side out. As you can see the edges are more rounded and marshmallow-y in shape.


The one on the right was sewn together with the wrong sides facing and the raw edges of the felt are still visible on the finished product. This resulted in a sharper edge and a little less of the stitching showing. My hubby liked the marshmallow shaped one (on the left) better so the rest of the sushi were finished that way.

My kids had a fun time trying to guess what I was making. Surprisingly, even my hubby had no idea until after I'd sewn the "nori" into tubes and the "fish" onto the "rice". Once they were all done though, the boys had fun "cooking the sushi" for us to eat.

Tuesday, February 15, 2011

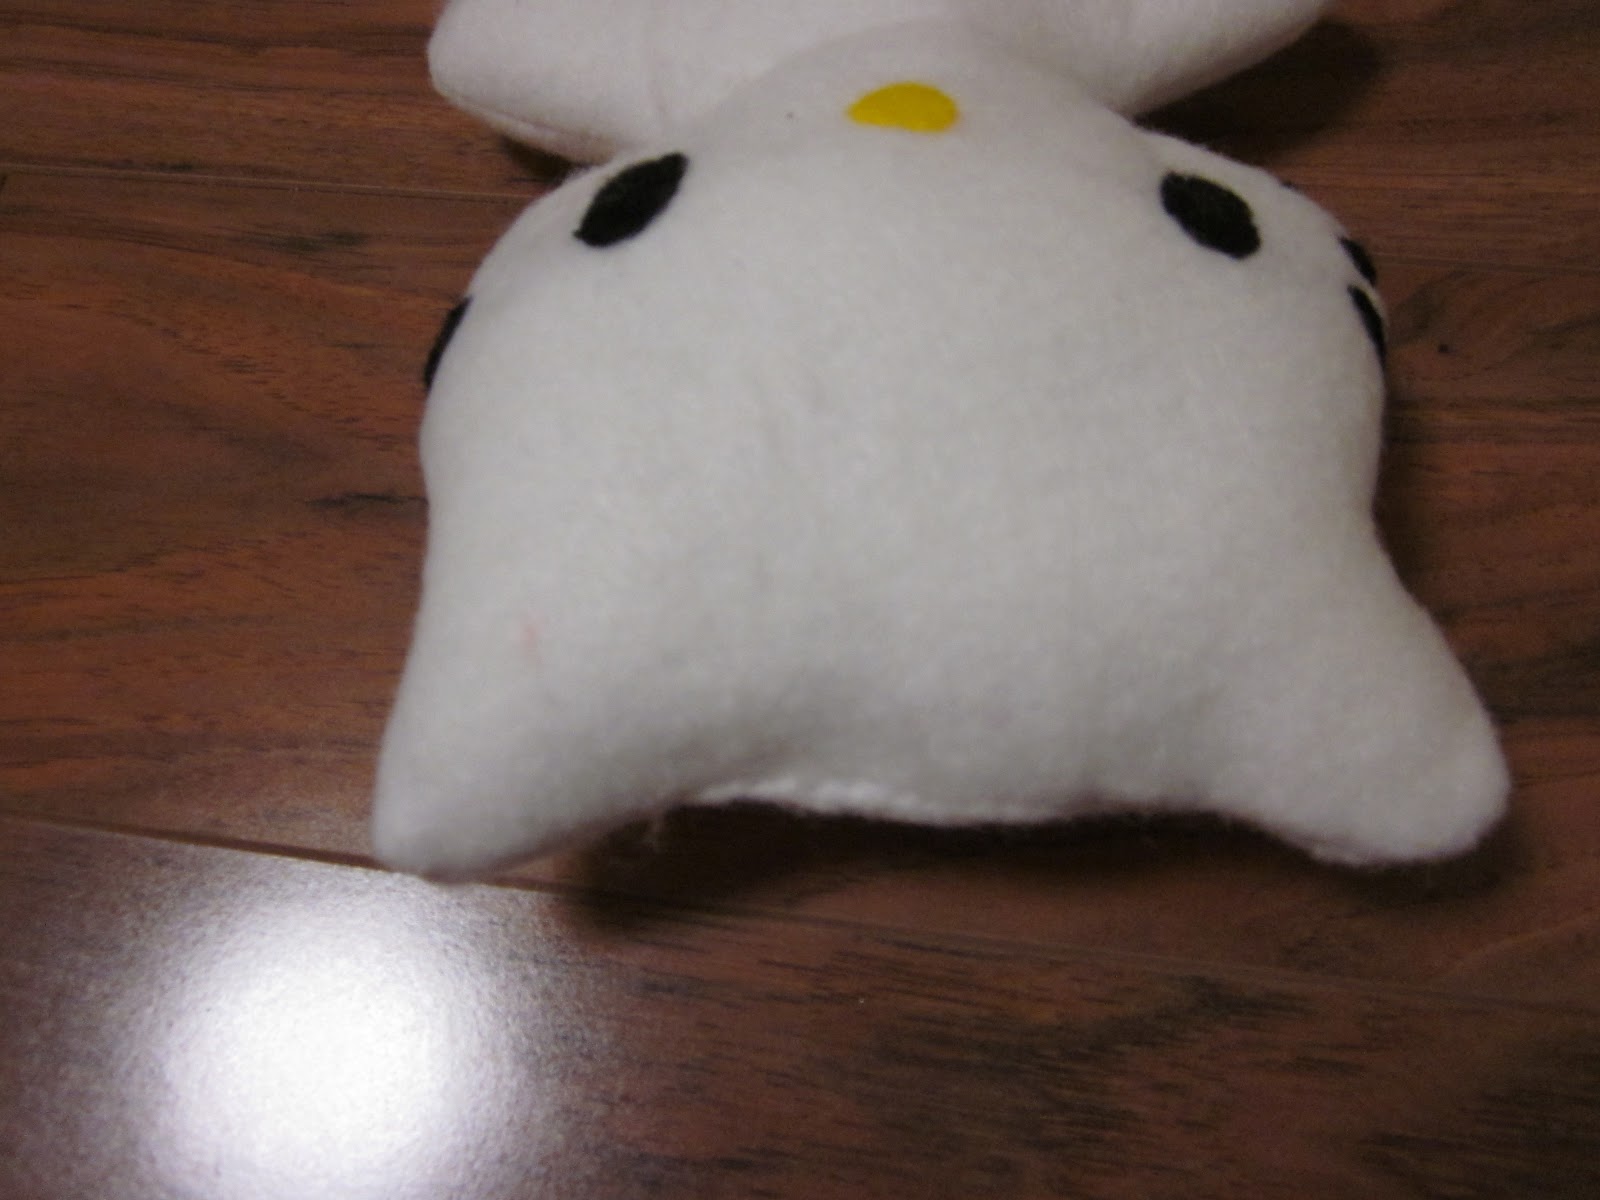
Felt Dress-Up Kitty

What little girl doesn't love playing dress-up? It could be themselves, dolls, little brothers/sisters... but for some little girls, nothing is better than dressing up a certain famous feline...

For a sweet little friend's birthday, I thought I would make her a Hello Kitty felt stuffie. On a recent visit to our house, she showed off her "favourite socks!" with Hello Kitty on them. In actuality they were My Melody, but I think I made that error too when I was young. (My gosh this cat has been around a long time!)

The design was simple enough. Just traced a picture of kitty onto felt, added on small seam allowance all the way around, and cut out two identical pieces. Then glued on eyes and a nose, with a tight zig zag stitch around the eyes and nose for stability, and hand stitched some whiskers on with black yarn. Finally, sewed the two pieces together with right sides facing, leaving the top of the head open for turning out and stuffing. Clipped all my curves, turned her inside out, filled her up with craft batting and hand stitched the hole shut.


I found from experience that stuffing something is easiest if all you have to do is jam the batting in along a straight line. In other words, it may have hidden my poorly done hand stitched seam a lot better if I had left the stuffie open between the legs or under the arm for stuffing, but then you would have to push batting up and around into the legs or the arms/head. Which would probably mean that you would never get those appendages as full of batting as if you were simply pushing batting down into them from the top of the head.

Is there something wrong about naked kitty? Or maybe she's just missing her bow?
Next was the ubiquitous red bow, I've never seen kitty without it. I was thinking of stuffing the bow too, but after considering how puffy and awkward a pouffy bow on top of a pouffy cat would be - especially for a three year old girl to handle and dress - I decided that a unstuffed, but still double-layered for stiffness, bow would be best. Anyway the reason for this digression into my subconscious mind is to explain why my bow fashioning is so much more tedious than just sewing a double thickness of felt together.

Took a rectangle of felt and round the corners. Folded it in half and sewed a short seam to give the bow a pleat. As seen in the next picture.

Bow with a pleat

Glued on a circle of felt to represent the knot. (The glue wasn't that stable, but not to worry, it was only acting as a temporary holder until after I sewed the backing on).

Traced and cut a rough copy of my bow. Sewed them together with right sides facing, leaving a small hole for turning it inside out.  Could have stuffed it, but didn't.
Voila! Slightly 3D red bow ready to be hand stitched onto kitty.
Still something awkward about a naked Hello Kitty even with the bow on. Kinda like: "Why is she wearing a bow but no clothes?!?"
Of course I had to include some clothes for kitty. Btw, I thought I would enjoy making small clothes. Since the clothes would be finished rather quickly, wouldn't this mean almost instant gratification? I didn't account for the fact that I hate sewing anything super small.... super thin bias tape, impossibly tiny sleeve holes, barely there hems... ugh! On the plus side, stuffie clothes can help you use up scraps of material, are basically two dimensional (i.e. easy to make by simply tracing a flat design around your stuffie, no need for sleeve caps!) and are pretty artistically free-reign.

Anyway, here are the clothes with their not so professional finishings.


All clothes closed with velcro at the back. Figured that would be easiest for dressing and undressing without enlisting mommy's help each time. Will have to see in a few weeks how the felt itself is holding up with velcro being so close to it. May regret this choice and use snaps next time.


Some other items to round out the Hello Kitty themed birthday gift: Hello Kitty bag from Michaels, Hello Kitty light wand from ??? in Taiwan, Hello Kitty underwear from Walmart.

The birthday girl seemed to enjoy her gift and I was informed by mom that Hello Kitty accompanied her to her first dental check up. So I guess even if kitty doesn't survive the ages, at least she has already earned her keep.


Friday, February 4, 2011

Felt Ornaments: Take-home craft for a Christmas baby's birthday

For my son's third birthday party, we made felt Christmas ornaments as a take-home craft. I pre-cut all the shapes (stars, trees, snowmen, reindeers, kugels, etc) and laid out felt shapes, sequins, ribbon, batting, popsicle sticks and glue on a disposable table cloth lined counter and let the kids at it.

Put the glue in these great paint cups that I got for under $6 at the local educational warehouse sale (even at their regular price of about $10, they are still a great deal for home crafts... anything to minimize the mess!) The kids had a lot of fun designing their own special Christmas keepsake. Lots of kids slopping glue all over their felt pieces and revelling in their independence.


I was really surprised at the ornament my son created because it was the first time I'd seen him create something that actually resembled the intended subject in both form and colour. It was also really cute because the reindeer specifically had to have a red nose. He also crafted the star which has kind of a retro, sixties feel to it.

I did make the mistake of not stuffing the ornaments beforehand. Silly me thought it would be easier for the kids to decorate flat ornaments as opposed to puffy pre-stuffed ornaments. Unfortunately, I completely forgot the short and often non-existent patience of small children. As soon as they put the final sticky, still-wet, gluey touch to their masterpieces, they wanted them stuffed and sewn shut for immediate play. So there was a little bit of bribery needed to get all the children to leave their creations with me to dry while they were sent off to clean up and play for a bit. Next time, the kids will definitely be decorating ready-to-go pieces. Or maybe I'll even run the felt through my sticker maker to make the craft glue-less?

Anyway, lots of fun was had by all.

Saturday, January 29, 2011

Dressing up post-Christmas clearance-priced stockings

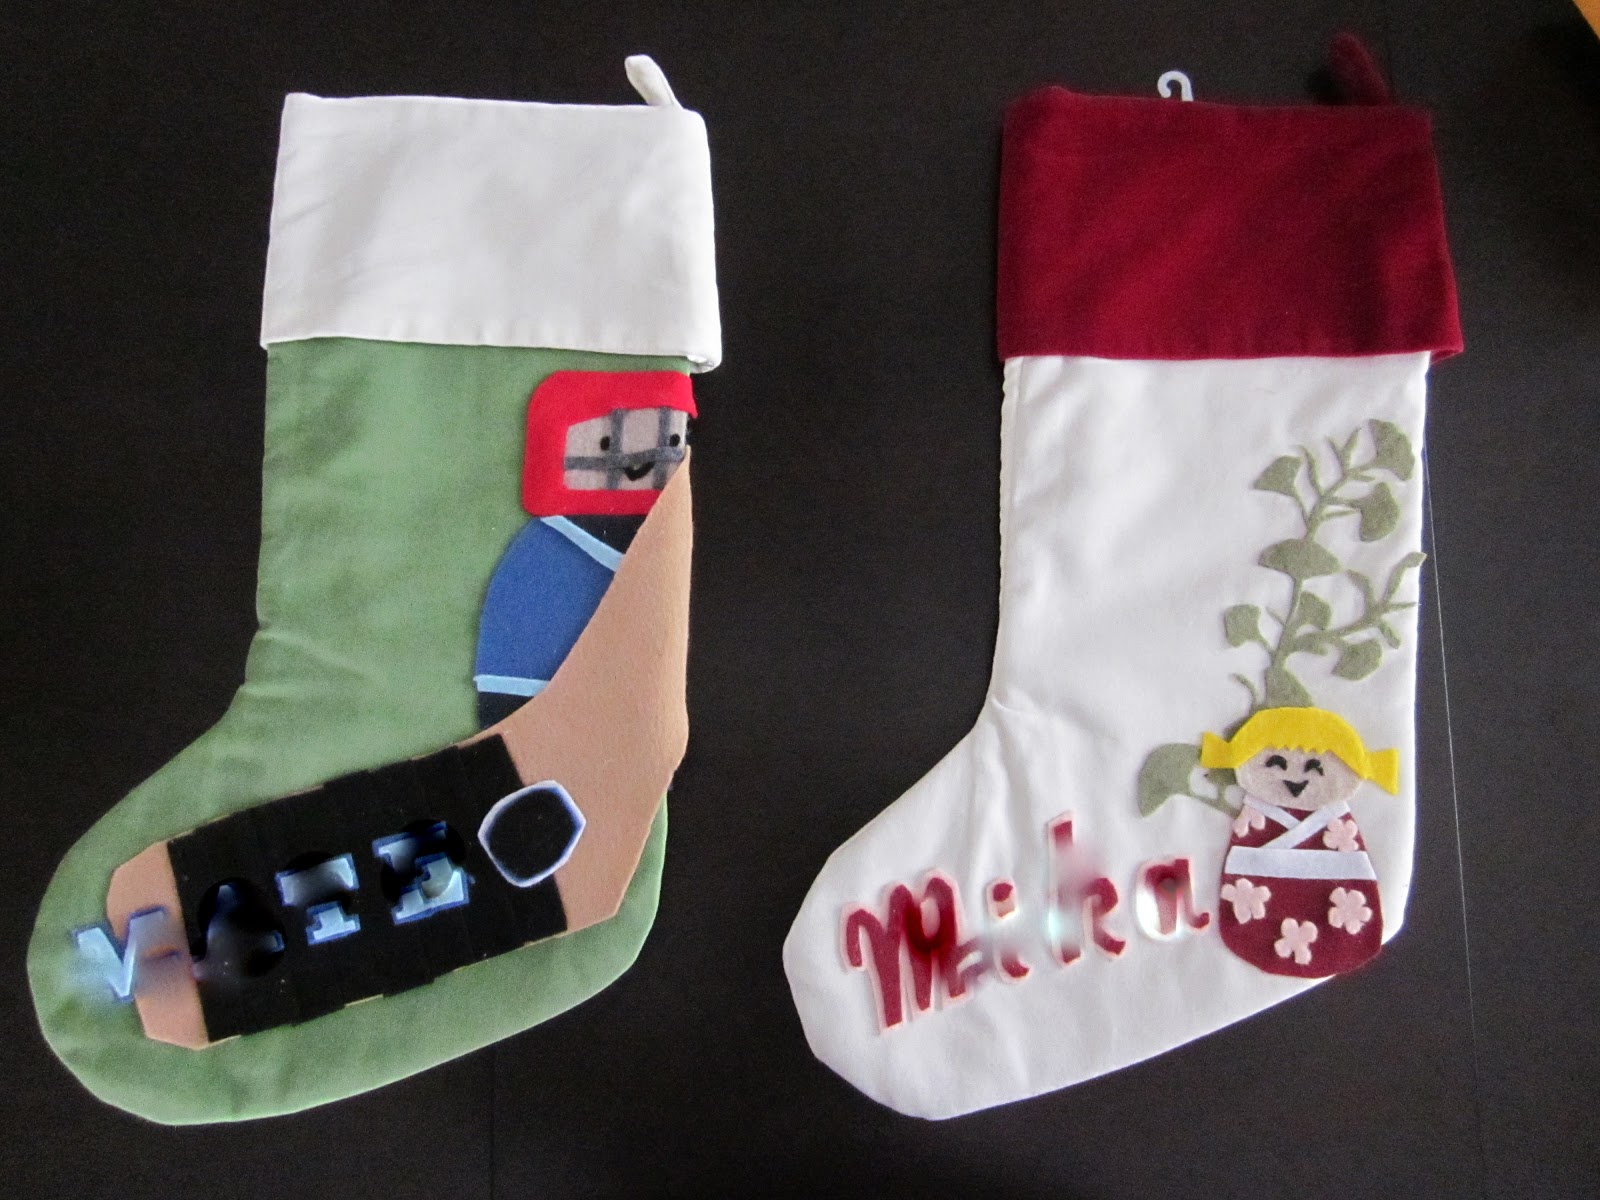
Personalizing store-bought items is the easiest way to add a little "with love from me" to an otherwise ordinary gift. Last year, a friend asked if she could buy a set of personalized stockings from me after seeing the felt applique stocking that I had made for my son. 

Last year's monkey stocking plus this year's new baby monkey: Kids' names top secret :)

Of course, selling personalized stockings was out of the question... I most happily made them as gifts. I spotted velveteen stockings at the local grocery superstore selling for a song* during the January clearances shortly after her request. I knew they would make the perfect backdrops for a brother and sister set of stockings.

*under $7 for both, I think

The siblings are partly of Japanese descent, a hockey-loving older brother and as a sweet-as-a-doll baby sister. I wanted to use all of these facts to make the stockings one of a kind, and totally recognizable as being made especially for the kids with love. The first thing that came to mind was this gorgeous kokeki doll that I got from a trip to Japan. It seemed the perfect silhouette to mimic in felt, simple and bold.

After that initial inspiration, all I had to do was sit down with a pen and paper and start sketching ideas. Once I had the rough design down, I started cutting the shapes out of regular old craft store felt and sticking them down with white glue. Everything except for the letters and gingko branch, I cut freehand. I like the patchwork effect that you get by layering the different rough pieces of hair, face, clothing, etc one over another. The block letters on the hockey stocking were printed off the computer using a large sized serif-font and traced onto the felt. The script on the kimono girl stocking is my own handwriting "chunkified" (definitely not a word, but you understand perfectly, n'est-ce pas?). The gingko branch I just drew onto the wrong side of the felt and cut out with a small sharp pair of scissors. I used two different colours of felt for the letters to create a matte effect which totally reminds me of old school varsity letters. 


Mystery names :)

The nice thing about a project like this is that it is meant to look handmade. There are lots of places to get get store-bought stockings professionally embroidered with your dear one's name, and there are a lot of tutorials on knitting or sewing your own stockings. Not everyone is so inclined to go wholly down the commercial route or wholly down the made-from-scratch road, so this is a nice compromise. The two stockings probably took just under 2 hours from the first sketch to completion (and could have been done even faster had I not chosen to design such an intricate gingko branch). It may seem tedious to cut small shapes out of felt, but it actually transported me back to early childhood and the joy I had in simply cutting felt/paper. The whole project could easily be done while watching your favourite show. This is definitely an economical, quick and fun way to give something that you put a lot of love into to someone you care a lot about.